


Claris Studio: List View

By uLearnIT
· 656 views
Claris Studio has another View called List. It is used to group records to keep track of them by category.
To be technically correct, the view is called List View. Not sure why this is the only View that has the word ‘View’ in it! That makes it a List View View.
List is the newest of the current set of Views available in Claris Studio. We have covered the other types of Views in previous articles:
When working with a table in Claris Studio, you will likely need a combination of Views to manage the data effectively. Also remember that for each Table, you can have more than one View of any type.
What is a List View?
A List View in Claris Studio is a grouped view of records in a table. When creating a List View, a field that requires an exclusive choice (Single Choice or Drop-down) is selected to define the groups. Records are grouped according to the data in that field.
It is important to note that it is not possible to change the field selected for grouping. However, you can create a new List View grouped on another field.
The List View displays a Group for each available choice. There is also a group for Ungrouped Items — records where the field is empty.
Create New List View
There are two ways to create a List View:
- using the Create New View button when looking at all Views
- from an existing Spreadsheet or Form View
Create New View
When using the Create New View button, List is one of the choices. This will create a brand new Table for the data underlying the List View. You do not have an option to select an existing Table. Claris Studio creates a new Table with six fields — Item, Group, Status, Priority, Person and Date. If this is not what you want, you can open the Sidebar and edit or delete the fields.
The Group field is used to group the records. There are no records in the new Table. The Group, Status and Priority fields are all Drop-down with the following options:
- Group — Group Name 1, Group Name 2
- Status — To Do, In Progress, Done
- Priority — High, Medium, Low
This is the only View for the new Table. You can create other Views, beginning with a Spreadsheet View, when looking at all Views. In Spreadsheet View you can edit the options for each Drop-down field. Edit the field using the column header menu, then edit the items in the Custom List.
There is an interesting bug with a new List View created in this way. While you can create a new Spreadsheet View for the table, if you create a new List View from the Spreadsheet View, you will not be given a choice of which field to use for grouping (it always uses the Group field).
Workaround: delete the Group field from the table. When you do this, a new List View provides the choice of Status and Priority fields for grouping; the existing List View (based on the now deleted Group field) will ask you to select a grouping field when next opened.
Create from Spreadsheet or Form
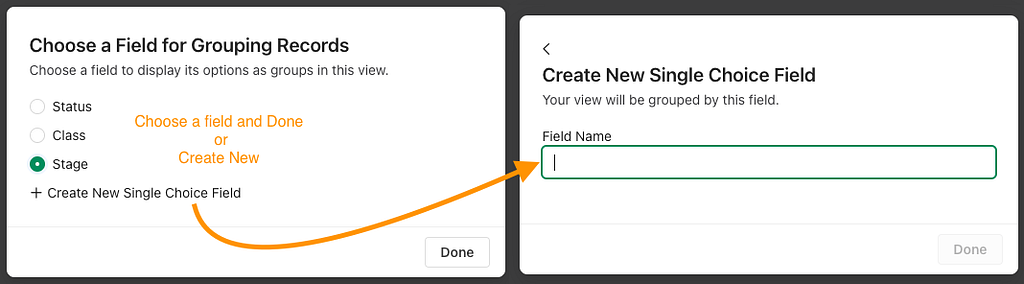
If you have an existing Table with a Spreadsheet or Form View, you can create a List View for it. Do this when looking at all Views.
This is likely to be the more efficient way to create a List View. You will begin with the fields you need in the Table and you either select or create a single choice field to be used for grouping.
Edit List View
The List View can be edited directly (in Views) or via a Hub. The only option not available when accessing via a Hub is the ability to create and edit Quick Filters.
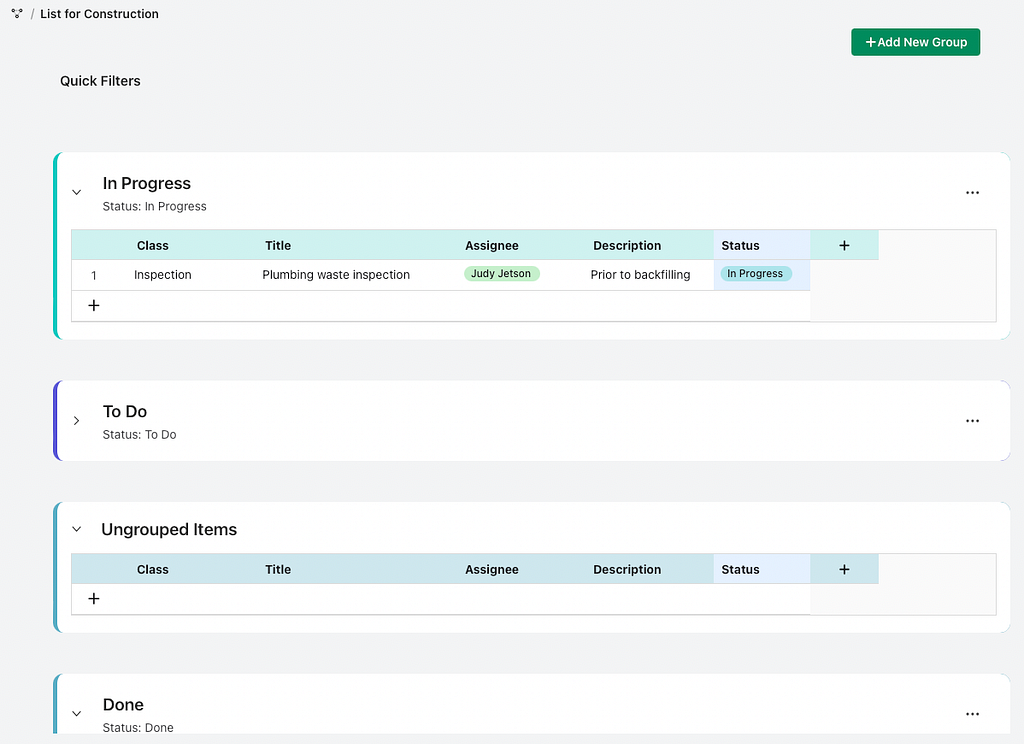
The top of the View consists of:
- All Views icon (four squares) — navigate back to all Views
- View name — edit directly (shown as List View 3 below)
- + Add New Group — add a new option to the selected grouping field (and therefore a new group); also used to restore archived groups (see below)
- Quick Filters — with chevron icon on right to view and edit Quick Filters

Quick Filters
Quick Filters appear as named buttons at the top of the View for all users. When looking at the View directly (not via a Hub), Quick Filters can be edited using the chevron button at the right.
 Adding a Quick Filter where Class is equal to Inspection
Each Quick Filter is given a custom name that should reflect the purpose of the filter applied. This custom name appears on a Quick Filter button. The three buttons at the right of each Quick Filter are Edit, Delete and Reorder. Drag the Reorder button up and down to change the order of the buttons.
When editing a Quick Filter you choose a field, an operator appropriate to the field type, and an option. You can apply multiple criteria to each quick filter — their effect is a logical AND where all must be true for a record to be displayed.
Quick Filter buttons are exclusive toggle switches — click to apply, click to turn off. Only one Quick Filter button can be applied at once. When applied, all records matching the Quick Filter conditions are displayed in each group; other records are hidden.
Beware of a bug also mentioned with List-Detail Views — if a Quick Filter is applied, new records will not be displayed if they do not match the Quick Filter. So you may inadvertently create a lot of new records! Make sure all Quick Filters are turned off before creating new records.
Groups
As mentioned above, the List View will initially display one group for each option defined for the single choice field plus a group for Ungrouped items.
Each group can be expanded or collapsed using the chevron icon at the top left of the group.
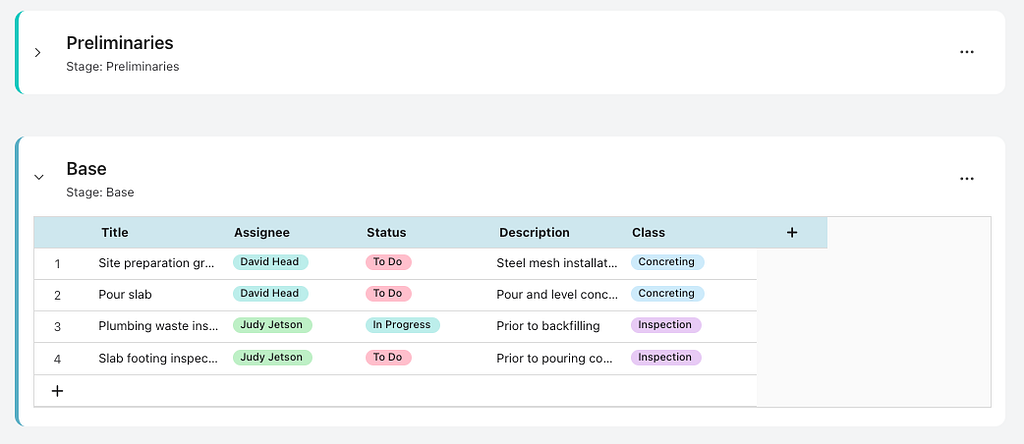 Preliminaries group is collapsed; Base group is expanded
Each group has a name (large bold text). The group name is initially set as the option for the grouping field. However, it can be changed for any group by clicking and directly editing.
Below the group name is the name of the grouping field (e.g. Stage) and the option for the group (e.g. Preliminaries).
At the right of each group is a meatballs icon with the option to Archive Group. This will hide the group and all its records in this List View. It does not affect the display of the records in any other Views. To restore an archived group, click the + Add New Group button. Here you can select any archived group as well as adding a new group.

Groups are initially displayed in the order of the options defined for the grouping field. Groups can be manually reordered by dragging the group header up or down (four headed arrow).
In any group, records may be edited as you would in a Spreadsheet View. Edit directly in each field or click the expand icon (box with two arrows) when mousing over the row number. The row number column also provides an icon to drag and reorder records in a group, and a box to select a record.
 Mouse over row number to see Reorder, Select and Expand
The + button in the last row of the group allows you to add a new record that auto-enters the option for the grouping field.
The column header menu provides the similar options to that in Spreadsheet View:
- Edit field
- Insert Column Left/Right
- Delete Column
- Freeze Column
- Hide Column
- Show Column
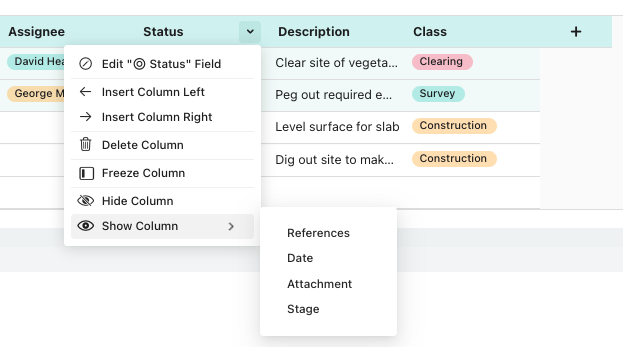
There is also a + button at the right end of the displayed columns to add a new Column to the Table.
Records can be dragged between groups, thereby automatically updating the data in the grouping field. Drag a single record or select multiple records to drag. Alternatively, you can right click a record or selected records, and choose Move To…. This context menu also contains Duplicate and Delete commands.

Conclusion
List View is an interesting way to keep track of records in custom groups. It is similar to Kanban View in that respect, but also similar to Spreadsheet View for display and editing of records.
Claris Studio: List View was originally published in Discover the Claris platform on Medium, where people are continuing the conversation by highlighting and responding to this story.
Recommended Comments