


Claris Studio: List-Detail View

By uLearnIT
· 642 views
Yet another way to view your data in Claris Studio is with List-Detail. This type of view is also called master-detail. Although you may not know the name, you will likely be quite familiar with this view from other apps such as Mail or Contacts.
The interface is made up of a master list and a detail area. When an item is selected in the list, the details are displayed in the detail area. The list usually displays key data about each item; the detail shows more data for the selected item.
 List-Detail showing detail for second item (selected)
The list and detail are commonly displayed side by side (as shown above). When there is less room, such as on a mobile device, a stacked approach displays the list by default. When an item is clicked or tapped, the view changes to detail for that item. A back button returns to the list.
List-Detail View
It is important to note that you can only work with data in List-Detail via a Hub. While other views such as Spreadsheet and Kanban can also be used in the actual View itself, List-Detail is more like Form View. Edit the view structure in Views; view and edit the data in Hubs.
Before we look at creating a List-Detail View, let’s take a look at a completed example. The following is a screenshot of a List-Detail View of Construction tasks.
 Standard List-Detail View in Claris Studio (via a Hub)
The List-Detail View in Claris Studio has the list on the left and detail on the right. In the above example, the third record is selected in the list. The View has an optional header object (blue bar).
At the top of the List there are search, filter and sort tools. At the bottom of the List, the + Add button allows you to add a new record. If there are more records, the list is vertically scrollable. Navigate between records by:
- clicking them in the list,
- using the navigation chevron buttons at the lower right of the Detail, or
- using the up/left and down/right arrow keys on your keyboard.
The record Detail on the right of the View allows editing of the data.
Musings: Curiously, the List is horizontally scrollable but shows no further information. Unfortunately, the list pane is not resizeable. The View has a fixed maximum size regardless of the browser window size. These may be addressed in future updates.
Create New List-Detail View
There are two ways to create a List-Detail View:
- using the Create New View button when looking at all Views
- from an existing Spreadsheet View
Create New View
When using the Create New View button, List-Detail is one of the choices. This will create a brand new Table for the data underlying the List-Detail View. You do not have an option to select an existing Table. Claris Studio creates a new Table with four fields — First Name, Last Name, Email and Comments. If this is not what you want, you can open the Sidebar and edit or delete the fields.
This is the only View for the new Table. You can create other Views, beginning with a Spreadsheet View, when looking at all Views.
 Create New View — default List-Detail table and view
Create from Spreadsheet
If you have an existing Table with a Spreadsheet View, you can create an additional List-Detail View for it. Do this when looking at all Views.

This is likely to be the more efficient way to create a List-Detail View. You will begin with the fields you need in the Table and a Detail section with all fields which can easily be edited.
Edit List-Detail View
As mentioned above, when the List-Detail View is opened directly (not via a Hub), it can be edited. This allows you to set up the list and detail areas as needed.

The white toolbar at the top of screen has four tools:
- Sidebar — click to toggle the sidebar open and closed, showing Fields (in table)
- Go To — Views with Same Data (table) — click to go to a view (this is an update; the old screenshot above does not show this button)
- Add Object — show the Add Object panel used to drag and drop field and static objects onto the page. Panel can be pinned to remain open
- Preview — preview and test the List-Detail (data submitted while previewing is not saved); options to test for mobile (360 px), table (768 px) and laptop (1024 px)
The grey toolbar has four tools:
- four square icon — click to return to all Views
- View name — click to rename View
- cogwheel icon — Page Settings — theme colour and option to make all field objects on the Detail required
- meatballs icon — Delete Page — deletes the View
The Header displays large text by default. This can be edited directly in the header. When the header is active, there are two buttons at the right:
- cogwheel icon — Header Settings
- meatballs icon — Delete header object
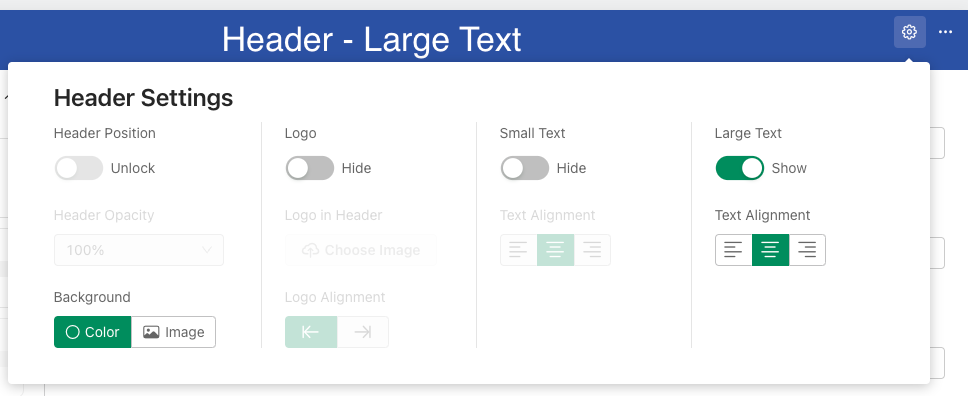
The Header Settings allow you to control the header content.
- Header Position and Opacity are currently disabled for List-Detail Views
- The header Background can be a colour (set by the page theme) or an image.
- Add a Logo (choose image) and set to left or right of header
- Two text sections — Small Text and Large Text — show or hide, set alignment
The header also has an icon (two lines) in the middle of the bottom that allows you to adjust the height.
Edit List
The List area has a few edits available. The main settings are in the cogwheel icon of the first dummy record.

The List Title is optional. If displayed, it appears in a fixed position above the List records and can be edited directly.
The other four fields — Title, Subtitle, Description and Detail — allow you to choose a field to display in a fixed position for each List record. This displays key data to enable the user to distinguish between records. Only one field can be displayed per position and there are no formatting options available. You must show a field for the Title but all other fields are optional.
Since the List pane is not resizeable, the space available for each field in the list is limited. If there is more data in the field than can be displayed, it is abbreviated with an ellipsis (…).
- Title — approx 13 characters
- Subtitle — approx 15 characters
- Description — approx 15 characters
- Detail — approx 6 characters
If the selected field is empty for a record, the name of the field is displayed in place. Each of the fields has a hover tooltip showing the complete data from the field.
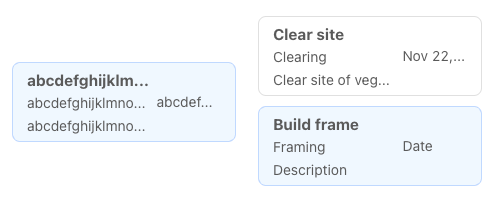 List items showing space for field data
In addition, you can set Filter conditions and Sort rules. These can be reset by any user using the View.
Edit Detail
The Detail area can contain both Field Objects and Static Objects. These can be added via the Add Object tool. Adding a Field Object in this way will create a new Field in your Table. To add an existing field not currently in the Detail area, drag it from the Sidebar Fields list.
The Detail area is edited in much the same way as a Form page. Refer to our previous article Claris Studio: Edit Web Forms for details of the features and methods.
Using List-Detail View
As mentioned above, List-Detail Views only display data from the underlying table when viewed via a Hub. This applies to both Manager and Member users. When viewing via a Hub, none of the View editing tools are available.
Search, Filter and Sort
Initially all records will probably be displayed in the list. The list is scrollable but there is no indication of the record count. There are three tools at the top of the list — Search, Filter and Sort.

Search — enter text in the Search box to progressively reduce the number of matching records as each character is entered. The number of records in the list is reduced, matching the search. The search is applied to every field e.g. searching for steel searches for the string in every field in the table. The search is not case sensitive.
Something to watch out for — if you have a current search and click + Add to create a new record, you will probably not see the new record — it does not match the search. So you think it has not worked and click it again! And again! Until you realise you have been creating a lot of empty records.
Clear the search by deleting the string or by clicking the x in the search box.
Filter — works by adding conditions as in other views such as Spreadsheet view. Refer to our previous article Claris Studio: Spreadsheet View for details.
Note that Search and Filter are additive — you will see the intersection of both results. Search is good for a quick search of all fields; Filter is better for more specific searches of certain fields.
Sort — works by adding rules as in other views such as Spreadsheet view. Refer to our previous article Claris Studio: Spreadsheet View for details. The records in the list are sorted according to the rules entered. For example, you can sort people by Last Name and then First Name.
Work with Records
Working with records means all the CRUD operations — create, read, update and delete.
Create — this is simply done using the + Add button at the bottom of the List on the left. As mentioned above, be aware of the effects of any search or filters in action — you may not see your new record. Also be careful with sort rules in place — new records may be added at the start or end of the list and you may not land on your new record! (likely a bug)
Read — You can read a record in the Detail area on the right. Simply navigate to a record by clicking on it in the List, use the previous and next chevron buttons, or use your keyboard arrows.
Update — Update a record by entering a field in the Detail area. Depending on the field type, various options will be available.
Delete — delete a record in the List area. Select the record and click the meatballs icon in the top right of the list item.
Warning — there is no delete confirmation and no undo — the record immediately disappears! That is not very nice!
Conclusion
That’s about it. Yet another view of your data in Claris Studio. My current opinion is that this View seems unfinished — there are a few things that just don’t seem to be well thought through. I would like to see some significant updates for this view.
Claris Studio: List-Detail View was originally published in Discover the Claris platform on Medium, where people are continuing the conversation by highlighting and responding to this story.
Recommended Comments